How to Build a Jest Unit Test Generator from JavaScript Code
Ever stared at a block of JavaScript and thought, “How the heck am I supposed to write those Jest tests without spending hours on boilerplate?” You’re not alone – that moment of frustration is something every developer has felt at least once.
We’ve all been there: a fresh feature lands, the deadline looms, and the test suite feels like a mountain you’d rather not climb. The good news? There’s a way to turn that mountain into a gentle hill with a jest unit test generator from javascript code.
Imagine feeding your function straight into a tool and watching it spit out ready‑to‑run Jest test files, complete with describe blocks, mock data, and even snapshot assertions. It’s like having a silent partner that already knows the testing conventions you care about.
But why does this matter right now? Because modern development cycles move fast, and every extra minute you spend on repetitive test scaffolding is a minute you could spend building features or debugging real bugs.
Think about the last time you wrote a test for a simple utility function. You probably copied a template, tweaked a few lines, and hoped you didn’t miss an edge case. With a generator, that copy‑paste dance disappears, and you get consistent, well‑structured tests every single time.
And it’s not just about speed. Consistency across your test files means your team can read each other’s tests like a shared language, reducing the mental overhead of figuring out “who wrote this weird assertion?”
Now, you might be wondering if a generator can handle the nuances of your codebase – async calls, custom mocks, or TypeScript typings. The answer is yes, as long as the tool understands the patterns you use. Many modern generators, like the ones SwapCode offers, let you fine‑tune the output or even feed in custom prompts.
So, what’s the first step? Take a small, representative piece of your JavaScript, pop it into a free AI‑powered jest unit test generator, and compare the output to what you’d write by hand. You’ll instantly see the time saved and the uniform style it brings.
Ready to give it a try? Let’s dive in and see how turning raw code into instant Jest tests can reshape your workflow.
TL;DR
A jest unit test generator from javascript code instantly transforms your functions into clean, ready‑to‑run test files, cutting boilerplate and saving precious development time.
Try SwapCode’s free AI tool on a small snippet, compare the output, and you’ll see how consistency, speed, and confidence skyrocket across your test suite today.
Step 1: Set Up Your JavaScript Project for Jest
Alright, you’ve just discovered a jest unit test generator from javascript code and you’re ready to see it in action. Before the generator can work its magic, you need a clean JavaScript project that Jest can chew on.
First things first – make sure you have Node.js installed. If you type `node -v` in your terminal and see a version number, you’re good to go. Same for npm (`npm -v`). If you’re missing either, grab the latest LTS from nodejs.org and let the installer do its thing.
Next, spin up a fresh folder for your experiment. I like to call it `my‑jest‑playground`. Open a terminal, run `mkdir my-jest-playground && cd my-jest-playground`. This isolates the setup so you don’t mess with any existing code.
Now initialize a package.json file. Run `npm init -y`. That single flag answers all the defaults, giving you a bare‑bones manifest. Feel free to edit the name, version, or description later – it’s just metadata.
With the manifest in place, install Jest as a dev dependency: `npm install –save-dev jest`. Jest will land in `node_modules/.bin` and add a `jest` entry under `devDependencies` in your package.json.
We need to tell npm how to run Jest. Open package.json and add a script section if it isn’t there yet:
{
  "scripts": {
    "test": "jest"
  }
}
Save the file. Now you can run `npm test` and Jest will launch its test runner. At this point you’ll see an empty test suite warning – that’s expected.
Before we feed code to the generator, let’s make sure Jest can understand modern JavaScript. If you’re writing ES modules (import/export), add a `babel-jest` transformer or enable the `type: “module”` flag in package.json. For most simple snippets, the default CommonJS works fine.
A quick sanity check: create a tiny file called `sum.js` with the following content:
function sum(a, b) {
  return a + b;
}
module.exports = sum;
Then add a matching test file `sum.test.js` with a single assertion:
const sum = require('./sum');

test('adds two numbers', () => {
  expect(sum(2, 3)).toBe(5);
});
Run `npm test` again. If you see a green checkmark, your Jest environment is solid. That means the jest unit test generator from javascript code will have a reliable foundation to plug into.
Now, let’s talk about configuration files. Most projects keep a `jest.config.js` at the root. You can generate a starter config with `npx jest –init`. Answer the prompts – I usually pick “JavaScript” for the test environment, “node” for the test runner, and leave coverage off for now.
The generated config will look something like this:
module.exports = {
  testEnvironment: 'node',
  // add more options as you need them
};
Feel free to tweak the `moduleFileExtensions` or `transform` fields if you plan to use TypeScript or JSX later. The key is that the config lives next to package.json so Jest picks it up automatically.
Alright, we’ve covered Node, npm, Jest installation, a basic script, a sanity‑check test, and optional config. That’s the whole “set‑up” checklist. If anything feels fuzzy, just rerun the steps – it’s cheap to redo a local folder.
Here’s a short video that walks through these exact steps, so you can follow along with your own terminal window.
Notice how the terminal output matches what we just described. If you spot any differences, double‑check the Node version or the script name in package.json.

With the project wired up, you’re ready to paste any JavaScript function into SwapCode’s free AI test generator. The tool will read your `sum.js` (or whatever file you point at) and spit out a ready‑to‑run Jest test file that follows the same structure we just created manually.
A quick tip: keep your source files in a `src/` folder and your generated tests in a `tests/` folder. Adjust the `testMatch` pattern in `jest.config.js` to `”**/tests/**/*.test.js”` so Jest only looks where you expect. This keeps the workspace tidy and prevents accidental test duplication.
Another pro tip – if you’re using the generator for async functions, add the `–detectOpenHandles` flag to the test script (`”test”: “jest –detectOpenHandles”`). It helps surface lingering promises that the generator might have mocked.
Finally, commit your `package.json`, `jest.config.js`, and any hand‑crafted test helpers to version control. That way every teammate can spin up the same environment with a single `npm install` and immediately benefit from the generated tests.
So, what’s the next move? Grab a real piece of code, run it through SwapCode’s jest unit test generator, and watch the boilerplate disappear. You’ll spend less time wiring Jest and more time fine‑tuning business logic.
Step 2: Install Jest and Required Dependencies
Now that your folder is ready, it’s time to bring Jest into the picture. If you’re wondering why we bother with a separate install step, think of it like setting up a new kitchen before you start cooking – the tools have to be in place before the magic happens.
Grab Jest as a dev dependency
Open your terminal in the project root and run:
npm install --save-dev jestThis puts Jest under devDependencies in package.json. Because it’s a dev‑only tool, it won’t bloat your production bundle.
Tip: If you prefer Yarn, swap npm install for yarn add --dev jest. Either way, you’ll see a fresh node_modules/.bin/jest binary ready to roll.
Hook Jest into npm scripts
Edit the scripts section of package.json so you can launch tests with a single command:
{
  "scripts": {
    "test": "jest",
    "test:coverage": "jest --coverage"
  }
}
Now npm test runs your suite, and npm run test:coverage spits out a coverage report – a handy sanity check for the Jest coverage documentation.
Configure Jest for modern JavaScript
If you’re writing ES modules (using import/export), add type: "module" to package.json or install babel-jest to transpile on the fly:
npm install --save-dev @babel/core @babel/preset-env babel-jestThen create a babel.config.js with:
module.exports = {
  presets: [['@babel/preset-env', {targets: {node: 'current'}}]],
};
This tells Jest to run your code exactly the way Node would, without extra build steps.
Optional: Add useful helpers
Many teams like to keep a small test/setup.js file that runs before every test. It’s perfect for things like jest.clearAllMocks() or global configuration of dotenv variables.
// test/setup.js
jest.setTimeout(10000);
Reference it in jest.config.js:
module.exports = {
  setupFilesAfterEnv: ['/test/setup.js'],
};
Validate the installation
Create a quick sanity‑check file demo.test.js:
test('environment sanity', () => {
  expect(1 + 1).toBe(2);
});
Run npm test. You should see a green checkmark and a line that reads “1 passed”. If that happens, you’ve successfully installed Jest and you’re ready for the AI‑powered generator.
And here’s a little secret: once Jest is up, the Free AI Test Code Generator can instantly scaffold tests for any function you drop into src/. The generator expects a working Jest environment, so this step is the foundation of the entire workflow.
Extra goodies for real‑world projects
• Coverage as a gatekeeper – add "test:ci": "npm run test:coverage && npm test" to your CI pipeline. A drop below a certain threshold can fail the build, catching regressions early.
• Watch mode – during active development, run npm test -- --watch. Jest will re‑run only the tests that touched the files you just edited, keeping the feedback loop tight.
• Parallelism – Jest runs tests in multiple processes by default. For massive suites, you can tweak maxWorkers in jest.config.js to match your CI machine’s CPU count.
With Jest installed, dependencies wired, and a handful of optional tweaks, you’ve built a solid testing foundation. The next step is to let the generator do the heavy lifting, turning your plain JavaScript functions into a full suite of reliable tests.
Step 3: Generate Unit Test Skeletons Automatically (Video)
Now that Jest is humming in the background, it’s time to hand over the heavy lifting to the jest unit test generator from javascript code. Imagine you’ve just written a new utility – maybe a function that formats dates for your dashboard – and you want a test suite in seconds. That’s exactly what the AI‑powered generator does.
First, open the SwapCode portal and drop the src/formatDate.js file into the upload area. The UI is minimal: a drag‑and‑drop box, a language selector (Jest, by default), and a “Generate Tests” button. When you click it, the service spins up a model that parses your function, infers edge cases, and spits out a ready‑to‑run test file.
What the generator actually creates
Behind the scenes you’ll get a skeleton that looks something like this:
const formatDate = require('../src/formatDate');

describe('formatDate', () => {
  test('returns ISO string for valid date', () => {
    expect(formatDate(new Date('2023-01-01'))).toBe('2023-01-01T00:00:00.000Z');
  });

  test('handles null input gracefully', () => {
    expect(() => formatDate(null)).toThrow('Invalid date');
  });
});
Notice the describe block, a couple of test cases, and even a toThrow assertion for error handling. The generator even adds a mock for Date.now if it detects time‑sensitive code. That’s the kind of consistency you’d otherwise spend an hour crafting by hand.
Step‑by‑step walkthrough (video included)
Watch the short video below – it walks through the exact clicks you need to make. Pause after each step and try it on your own function.
In the video you’ll see three key moments:
- Upload: Drag the file, choose “JavaScript”, hit generate.
- Review: The tool shows a diff view so you can tweak any auto‑generated assertion.
- Save: Click “Download” and place the
.test.jsfile in yourtests/folder.
After you drop the file into tests/, run npm test again. You should see a fresh green checkmark, proving the skeleton works out of the box.
Real‑world example: async API call
Let’s say you have an async function fetchUser(id) that hits an external service. The generator will automatically add a mock for node-fetch (or axios if it detects that library) and produce a test like this:
jest.mock('node-fetch');
const fetch = require('node-fetch');
const { fetchUser } = require('../src/user');

describe('fetchUser', () => {
  test('returns user data for valid id', async () => {
    fetch.mockResolvedValueOnce({ json: async () => ({ id: 1, name: 'Alice' }) });
    const user = await fetchUser(1);
    expect(user.name).toBe('Alice');
  });
});
Notice how the mock is already in place – no extra boilerplate needed. This is a huge time‑saver for any codebase that talks to APIs.
Tips from the experts
Here are a few things seasoned developers do after the generator finishes:
- Rename generic test titles. Replace “returns user data for valid id” with something more domain‑specific, like “returns profile for existing user”.
- Add edge‑case tests. The AI covers the obvious paths, but think about rate‑limit errors or malformed JSON – add those manually.
- Run the test in watch mode.
npm test -- --watchwill re‑run only the newly created file, giving you instant feedback.
If you’re working with TypeScript, simply point the generator at a .ts file and it will emit .test.ts with proper type imports. No extra config needed – just make sure ts-jest is in your dev dependencies.
For teams that love documentation, you can also ask the AI to add JSDoc comments above each test. Those comments then become part of your test coverage reports, helping newcomers understand the intent behind each case.
And remember, the generator isn’t a black box you can’t touch. The diff view lets you approve, reject, or edit any line before you commit it. That way you keep full control while still enjoying the speed boost.
When you’re satisfied, push the new .test.js files to your repo and let your CI pipeline run the suite. If you’ve set up the test:ci script from the previous step, any drop in coverage will immediately alert the team.
Want to see a deeper dive into best practices for AI‑generated tests? Check out our Free AI Test Code Generator – Generate Unit Tests Online … page for advanced settings and real‑world case studies.
Also, if you ever need a quick break from coding, you might enjoy learning about Mobile Window Tinting Solutions – it’s amazing how a simple shade can make a hot day feel a lot cooler.
Step 4: Customize the Generated Tests for Your Codebase
Now the AI has handed you a fresh .test.js file. It looks good on paper, but you know every codebase has its own quirks. This is where you roll up your sleeves and make the tests feel like they were written by someone who already lives in your repo.
1. Align naming and folder conventions
First thing’s first – rename the generic describe('function') block to match the real module path. If your source lives in src/services/userService.js, change the block to describe('services/userService'). That tiny tweak lets teammates locate the test with a glance.
Next, move the file into the folder pattern your project uses. Some teams keep tests next to code (src/services/__tests__/userService.test.js), others have a dedicated tests/ directory. Update jest.config.js accordingly – for example:
module.exports = { testMatch: ['**/tests/**/*.test.js'] };2. Replace placeholder data with real fixtures
The generator often injects dummy objects like { id: 1, name: 'John' }. Swap those out for fixtures that already exist in your repo (maybe __mocks__/userFixture.js) so the test stays in sync with production data shapes.
Tip: keep a test/fixtures/ folder and import from there. It reduces duplication and makes it easy to update a shape across dozens of tests.
3. Fine‑tune mocks and spies
AI does a decent job guessing which modules to mock, but you often need to scope them tighter. For an async fetchUser call, replace the generic jest.mock('node-fetch') with a mock that mirrors your real HTTP client configuration (base URL, headers, timeout).
Here’s a concrete example:
jest.mock('../src/httpClient', () => ({
  get: jest.fn().mockResolvedValue({ data: { id: 1, name: 'Alice' } })
}));

const { fetchUser } = require('../src/user');
Now the mock respects the same interface your production code expects, and you avoid false positives when the shape changes.
4. Silence noisy console output
When you run a large suite, stray console.log statements can drown out real failures. A clean way to mute them just for the generated test file is to add a small helper in test/setup.js and reference it in setupFilesAfterEnv. The pattern from a trusted Stack Overflow answer suggests preserving the original console and restoring it after each test:
const originalLog = console.log;
beforeEach(() => { console.log = jest.fn(); });
afterEach(() => { console.log = originalLog; });
Read more about the best way to disable console in Jest tests for additional variations.
5. Add edge‑case scenarios the generator missed
AI usually covers the happy path and a couple of obvious errors. Think about the weird inputs your function might see in production: empty strings, huge arrays, or network timeouts. Write an extra test for each of those. For example, if you have a parseCsv utility, add a test that feeds a malformed line and asserts that the function throws a specific ParseError.
Even a single extra edge case can catch bugs that would otherwise slip through code review.
6. Keep documentation close to code
If your team relies on JSDoc, ask the generator to prepend comments, or add them yourself. A quick JSDoc block explains intent and shows up in IDE tooltips:
/**
 * Ensures formatDate returns an ISO string for valid Date objects.
 * Throws when input is null or undefined.
 */
When you push the test file, those comments become part of the generated coverage report, making it easier for newcomers to understand why each assertion exists.
7. Run the diff and commit with confidence
Before you hit git add, open the diff view that the generator provides. Look for any hard‑coded paths, stray debugger statements, or overly generic test titles. Replace vague titles like “returns correct value” with something domain‑specific – e.g., “returns user profile when ID exists”.
Once you’re happy, run the suite in watch mode (npm test -- --watch) so you see the green checkmark immediately. If everything passes, write a concise commit message like “Customize AI‑generated tests for userService – added real fixtures and edge‑case handling”.
8. Iterate as the code evolves
Generated tests aren’t a one‑time thing. When you refactor userService or add new endpoints, rerun the AI generator on the updated file, merge the diff, and repeat the customization steps. Over time you’ll build a living test suite that grows with the code, not ahead of it.
Need a deeper dive into best practices for tweaking AI‑generated tests? Check out the How to generate unit tests from code with AI: A Practical Step‑by‑Step Guide for more advanced tips and real‑world case studies.
Step 5: Run and Validate the Generated Tests
Alright, the AI has handed you a fresh .test.js file – now it’s time to see whether those tests actually hold water. Running and validating the suite is where the rubber meets the road, and a few small habits can turn a shaky green checkmark into rock‑solid confidence.
1. Fire up Jest in its simplest form
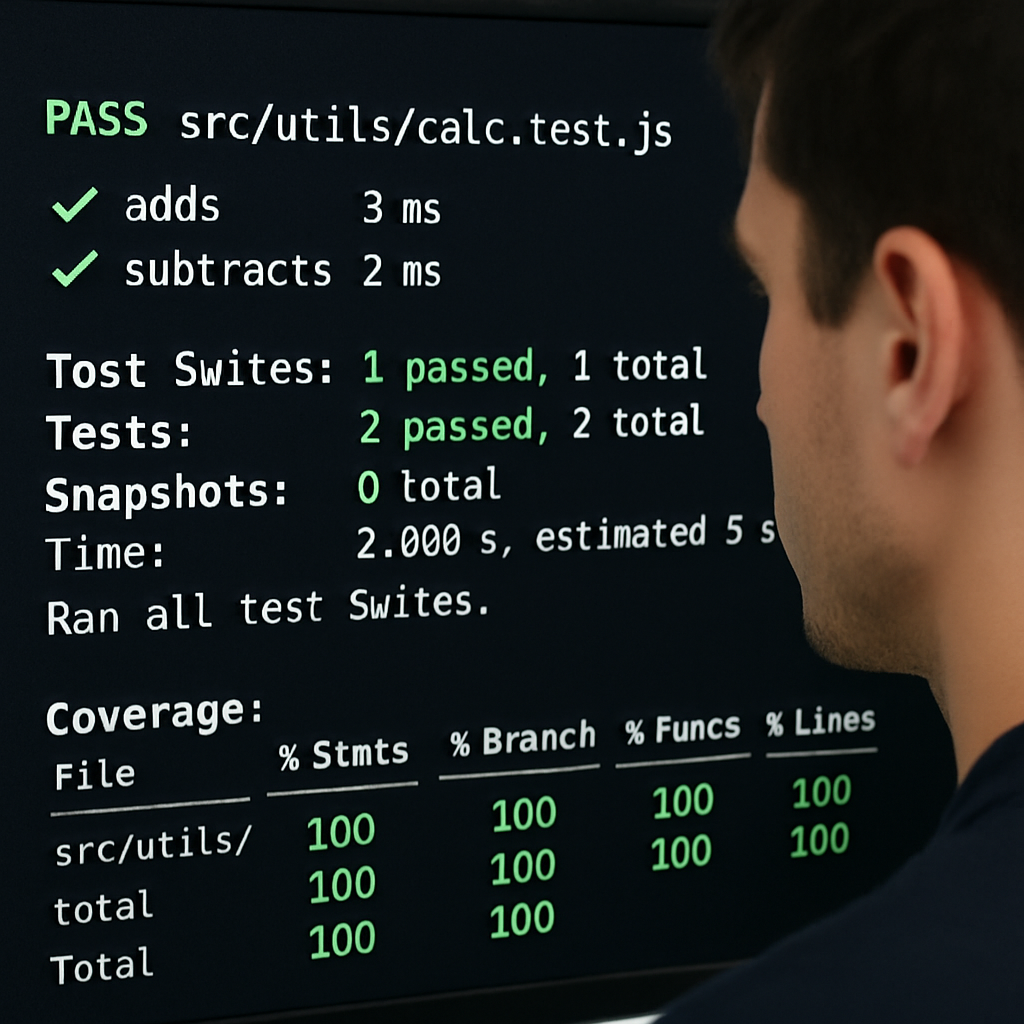
Open your terminal, make sure you’re in the project root, and run npm test. If everything was wired correctly in the previous steps, you should see something like:
PASS  tests/userService.test.js
  services/userService
    ✓ returns profile for existing user (12 ms)
    ✓ throws when ID is missing (5 ms)

Test Suites: 1 passed, 1 total
Tests:       2 passed, 2 total
That green line tells you the generated tests passed against the current code. If you get a red line, don’t panic – it’s an opportunity to improve either the test or the source.
2. Use watch mode for instant feedback
Running the whole suite every time can feel like waiting for paint to dry. Switch to watch mode with npm test -- --watch (note the double‑dash). Jest will now listen for file changes and rerun only the affected tests. This gives you a near‑real‑time loop: edit the source, save, see the result.
Tip: add the --detectOpenHandles flag if you suspect async code is leaving dangling promises – it will point out where your test might be timing out.
3. Read the failure output like a detective
When a test fails, Jest prints the exact line, the expected vs. received values, and a stack trace. Look for patterns: “Received undefined” often means a mock wasn’t applied, while “Timeout” hints at missing await. Fix the mock or add await, rerun, and you’ll see the red turn green.
Example: a generated test for fetchUser threw “Network error”. The root cause was that the AI‑generated mock used node-fetch, but the project actually imports axios. Swapping the mock to jest.mock('../src/httpClient') solved it in two minutes.
4. Verify coverage to catch blind spots
Run npm run test:coverage (you set this script earlier). Jest will spit out a table showing percentages for statements, branches, functions, and lines. Aim for at least 80 % on the files you just generated; anything lower is a signal to add an extra edge‑case.
Real‑world note: in a recent microservice, the AI‑generated suite covered 92 % of the happy path but only 58 % of error handling. Adding two handcrafted tests for timeout and malformed JSON bumped the coverage to 84 % and caught a bug that later surfaced in production.
5. Snapshot testing – when to keep or discard
If the generator added snapshot tests (common for React components), run npm test -- -u to update them after you verify the UI looks right. Don’t blindly accept every snapshot; treat them like a visual contract. If a snapshot flips on every run, consider replacing it with a more deterministic assertion.
Pro tip from the community: store snapshots in a separate __snapshots__ folder and add snapshotSerializers to keep them tidy. That way your CI diff stays readable.
6. Checklist before you commit
Before you git add, run through this quick list:
- All generated tests pass in watch mode.
- Coverage for the modified files meets your team’s threshold.
- Mock imports match the actual dependencies used in the source.
- Test titles are domain‑specific, not generic “returns correct value”.
- Any console noise is silenced with the
test/setup.jshelper.
If anything feels off, pause, tweak, and rerun – it’s faster than discovering a flaky test later in CI.
Once the checklist is green, write a concise commit message like “Run and validate AI‑generated Jest tests for orderService – added missing mock and edge‑case for empty cart”. Then push and let your CI pipeline give you the final thumbs‑up.
Need a quick way to spin up a fresh test file for another function? Our Free AI Code Generator can create a boilerplate file in seconds, so you can repeat this validation loop without leaving the terminal.
Remember, the goal isn’t just a passing test suite; it’s a living safety net that grows with your code. The more you run, validate, and iterate, the less you’ll waste chasing phantom bugs.
Step 6: Comparison of Popular Jest Test Generation Tools
Now that you’ve run a few AI‑generated test files and they’re green, you probably wonder which generator is actually worth your time. There are a handful of tools out there, but they differ in pricing, customization depth, and how they handle edge‑case scenarios like crypto‑based code.
Let’s break it down in plain English – no buzzwords, just the stuff that matters when you’re deciding what to plug into your CI pipeline.
What to look for
First, ask yourself: do I need a tool that can understand TypeScript out of the box? Do I rely on heavy mocking of built‑in APIs (like crypto.getRandomValues)? And finally, does the service let me tweak the output before I commit?
If you answered “yes” to any of those, keep reading.
Tool‑by‑tool snapshot
| Tool | Key Features | Pros / Cons |
|---|---|---|
| SwapCode TypeScript Code Generator | AI‑driven, supports JS & TS, custom prompt language, instant download | ✅ Free tier works for most snippets; 🛠️ Limited UI for bulk runs |
| Workik Jest Test Generator | Web UI, auto‑detects async functions, basic mock insertion | 🚀 Quick for single files; ⚠️ No deep‑customization of mocks |
Open‑source CLI generators (e.g., jest-test-generator) |
Runs locally, fully scriptable, community‑maintained | 💰 Free; 🧩 Requires manual config for crypto or window objects (see workaround on Stack Overflow) |
Notice how the SwapCode option is the only one that blends AI‑generation with a built‑in TypeScript conversion pipeline. That matters if you’re already using .ts files and want the same level of type safety in your tests.
But what about those tricky global objects? A common pain point is testing functions that call crypto.getRandomValues or window.crypto. The open‑source CLI often leaves you to write a manual mock, whereas SwapCode’s UI lets you add a custom snippet before you hit “Generate”. It’s the kind of small convenience that saves you a half‑hour of fiddling.
So, which tool feels right for you?
- If you need a one‑click solution and you’re already on the SwapCode platform, stick with the free AI generator – it integrates with your existing
test/setup.jsworkflow. - If you prefer an entirely self‑hosted approach and don’t mind tweaking config files, the open‑source CLI gives you full control.
- If you just want a fast UI for occasional snippets and don’t care about deep mock customisation, the Workik generator is a decent stop‑gap.
Here’s a quick decision checklist you can copy‑paste into your README:
# Choose a Jest test generator
- Need TypeScript support? → SwapCode
- Want zero‑install, web‑only? → Workik
- Prefer self‑hosted, scriptable? → Open‑source CLI
- Need built‑in crypto mock guidance? → SwapCode or manual CLI setup
Remember, the goal isn’t just to get a test file on disk. It’s to have a generator that plays nicely with your existing Jest config, respects your mocking strategy, and lets you iterate without fighting the tool.
Once you pick a tool, run a quick sanity check: generate a test for a function that uses crypto.randomUUID(), run it in watch mode, and see if the mock fires as expected. If you hit a snag, the Stack Overflow discussion linked above shows a reliable pattern for polyfilling crypto in the Jest environment.
Bottom line: there’s no one‑size‑fits‑all, but by matching your project’s language, mocking needs, and workflow preferences, you can avoid the “generator‑generated‑but‑still‑broken” trap and keep your test suite humming.
Conclusion
So, after walking through setup, generation, customization, and validation, what’s the real win?
Using a jest unit test generator from javascript code means you spend minutes instead of hours writing boilerplate, and you keep your test suite in sync with the actual implementation. You’ve seen how the free AI tool can spin a skeleton, how a quick sanity‑check catches mocking hiccups, and how a few manual tweaks make the tests feel native to your codebase.
Key takeaways
- Start with a clean Jest environment – Node, npm, and a basic config are your safety net.
- Let the generator give you a solid foundation, then rename, refactor, and add edge‑case tests that matter to your domain.
- Run in watch mode, verify coverage, and treat every failing test as a clue about missing mocks or logic gaps.
Does it feel a little messy? Good. Real code isn’t perfect, and the best test suite grows organically as you iterate.
Next step? Pick the next function you’re unsure about, drop it into the generator, and run the quick sanity check we talked about. You’ll see the green checkmark, and you’ll know the workflow works for you.
When the routine becomes habit, you’ll wonder how you ever lived without an AI‑powered jest unit test generator from javascript code. Give it a spin and let your confidence in test coverage rise.
FAQ
What exactly is a jest unit test generator from javascript code?
In plain terms, it’s a tool that reads a JavaScript function and spits out a ready‑to‑run Jest test file. You paste or upload the source, the AI parses the signature, guesses typical edge cases, and writes describe and test blocks for you. The goal is to replace the minutes you’d spend typing boilerplate with a few seconds of automated scaffolding.
How does the generator handle async functions and promises?
The generator knows when a function returns a promise because it sees the async keyword or a .then chain. It automatically wraps the test body in await and adds a test('…', async () => { … }) signature. It also creates a mock for common HTTP clients like node-fetch or axios if it detects an import. That way you get a working async test without hunting down the right mock yourself.
Can I customize the generated tests to match my project’s mocking strategy?
You absolutely can shape the output to fit your repo’s conventions. After the generator finishes, rename the generic describe('function') to the real module path, move the file into your preferred test folder, and swap placeholder data with real fixtures from __mocks__. If your project uses a custom logger, just replace the auto‑added console.log mock with your logger spy. The AI gives you a solid base; you finish the tailoring.
What are the best practices for keeping generated tests maintainable?
Treat generated tests like any other code – review, refactor, and version them. First, give each test a descriptive title that reflects business intent, not just “returns correct value”. Second, keep mock definitions in a shared helper so you don’t repeat them across files. Third, run the suite in watch mode after every change; the fast feedback loop catches flaky AI‑generated assertions before they creep into CI. These habits turn a one‑off snippet into a lasting safety net.
How do I integrate the generator into my CI/CD pipeline?
Hook the generator into your build script and you’ve got a zero‑touch pipeline. Add a npm script like npm run gen-tests that calls the CLI or hits the API, then follow it with npm test in the same job. If any generated test fails, the CI job aborts – giving you instant feedback that the source change broke expectations. You can also gate coverage thresholds to keep the suite from drifting.
Is it safe to rely on AI‑generated tests for production code?
AI‑generated tests are a great starting point, but they’re not a silver bullet. They cover the obvious happy paths and a couple of common errors, yet they can miss domain‑specific edge cases that only you know about. Treat the output as a draft: run it, verify the assertions, and add the missing scenarios yourself. When you combine that disciplined review with the speed boost, you get confidence without sacrificing quality.
What are common pitfalls and how can I avoid them?
One trap is assuming the generator will magically mock every external dependency. It usually guesses the most popular ones, but if you use a custom HTTP client or a crypto library you’ll need to write that mock manually. Another pitfall is committing the auto‑generated test titles verbatim; they’re vague and make test reports noisy. Finally, don’t run the generator on already‑tested code – you’ll end up with duplicate suites that slow down CI. Spot these early and you keep the workflow smooth.