How to Generate Terraform Configuration from Plain English: A Step-by-Step Guide
Ever stared at a blank Terraform file and thought, “If only I could just tell the cloud what I need in plain English?” You’re not alone. Many DevOps engineers wrestle with the verbosity of HCL, especially when they’re juggling multiple environments or trying to onboard a new teammate.
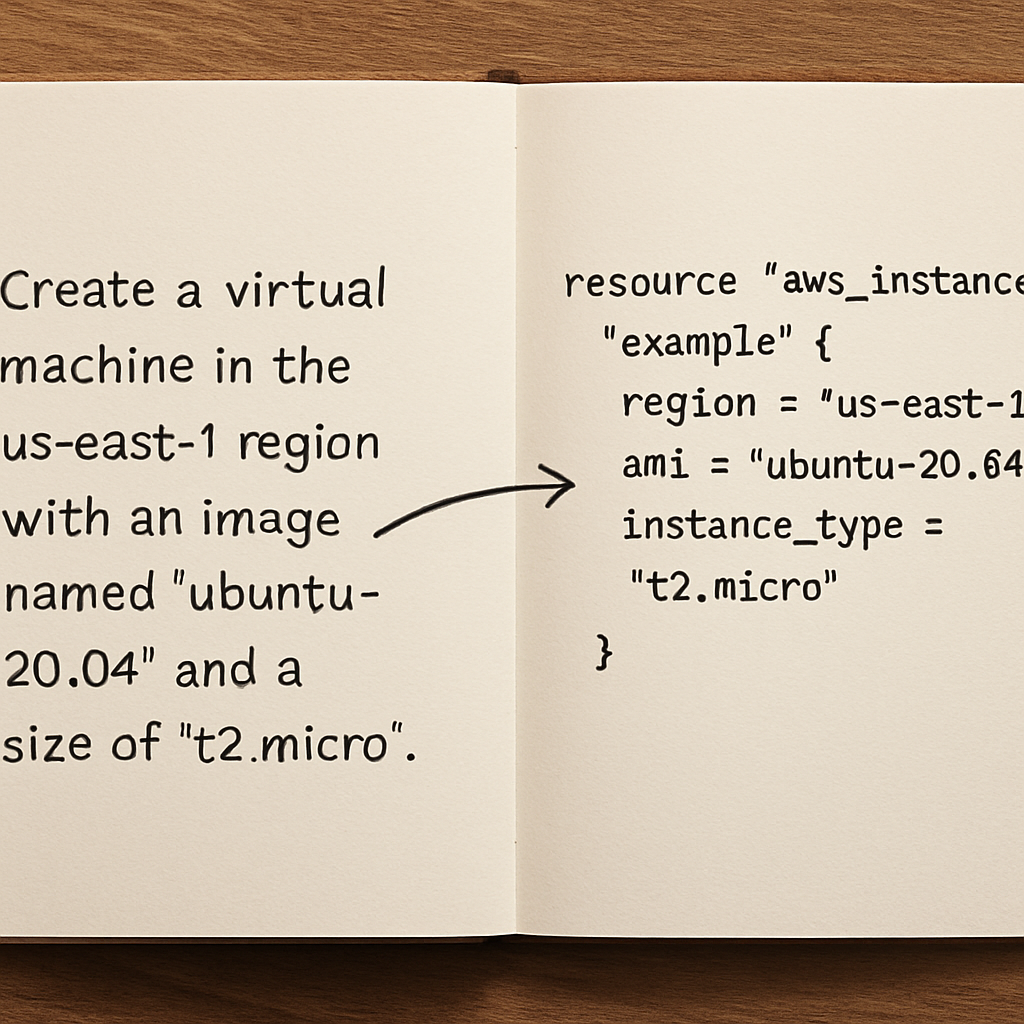
Imagine you need a VPC with two subnets, a security group that only allows SSH from your office IP, and an EC2 instance running a specific AMI. Normally you’d draft dozens of lines, copy‑paste modules, and hope you didn’t miss a brace. But what if you could type a simple sentence like, “Create a VPC with two public subnets, a security group for SSH from 203.0.113.0/24, and launch an Ubuntu 22.04 instance” and let AI spin the Terraform code for you?
That’s exactly what modern AI‑powered code generators do. They parse your natural‑language request, map it to Terraform resources, and output ready‑to‑apply configuration. It’s a game‑changer for rapid prototyping and for teams that want to keep their IaC documentation in sync with business requirements.
Here’s a quick real‑world snapshot: a fintech startup needed to spin up isolated test environments for each pull request. Instead of maintaining a massive set of modules, they fed plain‑English specs into an AI tool, got a Terraform file in seconds, and hooked it into their CI pipeline. The result? Deployment time dropped from 15 minutes to under a minute, and the error‑rate fell dramatically because the generated code followed best‑practice patterns.
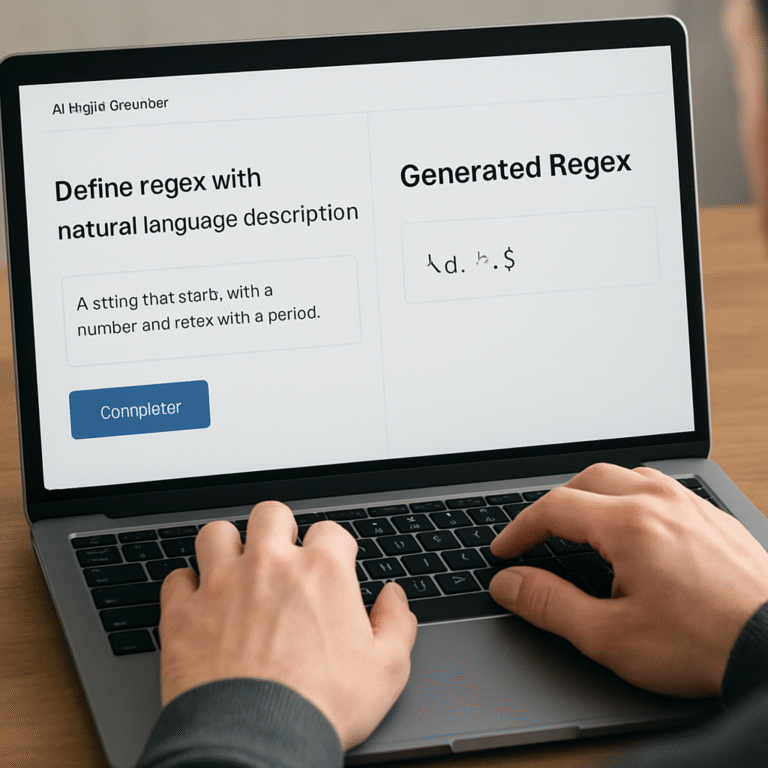
Want to try it yourself? SwapCode offers a Free AI Code Generator | Create Code from Plain English that supports Terraform among many other languages. Just paste your description, hit generate, and you’ll receive clean, formatted HCL you can immediately commit.
If you’re wondering how to keep this momentum going, consider documenting each generated snippet in a shared knowledge base. That way, future team members can see the natural‑language intent behind the code, reducing the learning curve.
And for those who also need to share their IaC success stories with the wider community, Rebelgrowth’s guide on AI‑driven SEO tools shows how to turn technical write‑ups into SEO‑friendly blog posts that attract more developers to your workflow.
So, next time you face a blank Terraform file, remember you can simply describe what you need in plain English and let AI do the heavy lifting. Let’s dive deeper into the step‑by‑step process of turning those sentences into production‑ready configurations.
TL;DR
Using AI to generate Terraform configuration from plain English turns a vague description into ready‑to‑apply HCL in seconds, slashing setup time and cutting human error.
Try SwapCode’s free AI code generator, paste your intent, and watch the platform instantly produce clean, production‑ready Terraform files you can commit without a typo.
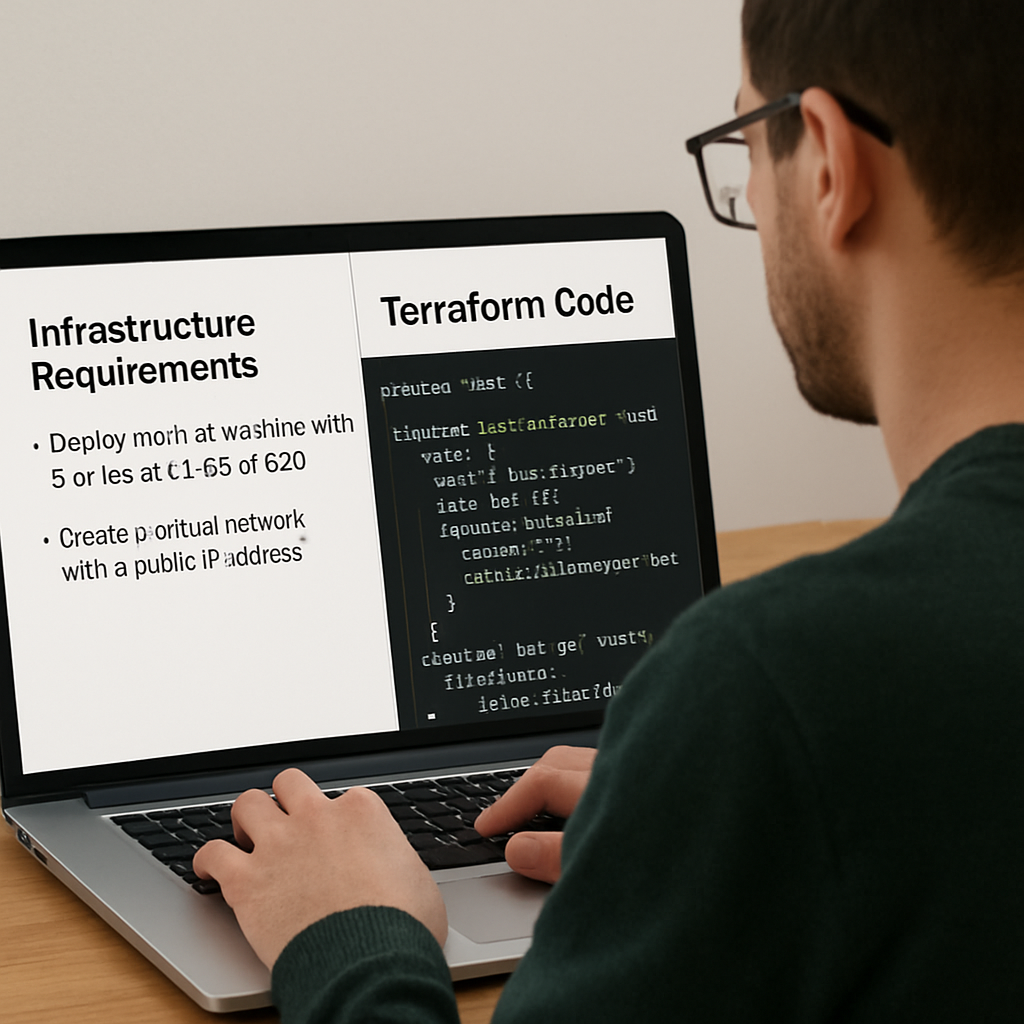
Step 1: Define Your Infrastructure Requirements in Plain English
Before you even think about pressing the AI button, pause and ask yourself what you really need from the cloud. Is it a simple VPC with a couple of subnets, or a full‑blown multi‑AZ architecture with load balancers, databases, and IAM roles? Writing that out in plain English helps the model understand the scope without getting lost in Terraform jargon.
Grab a fresh document or a quick note in your favorite editor and start describing the environment as if you were explaining it to a teammate over coffee. For example, “I need a VPC with two public subnets in us-east-1, a security group that only allows SSH from 203.0.113.0/24, and an EC2 instance running Ubuntu 22.04 with a t3.micro size.” Notice how we kept it conversational? That’s the sweet spot for the AI.
Why plain English matters
AI models excel at pattern matching, and the clearer the pattern you give them, the cleaner the code they spit out. When you sprinkle in technical terms like “CIDR block” or “resource tag” without context, you risk getting a half‑baked HCL snippet that needs manual tweaking. By framing the request in everyday language, you let the model map your intent to the right Terraform resources automatically.
Another tip: be explicit about constraints. Instead of saying “a fast instance,” say “a t3.micro instance with 2 vCPU and 1 GB RAM.” The model can then pick the exact AWS instance type rather than guessing. This reduces the back‑and‑forth you’d otherwise have to do after generation.
What about naming conventions? If your organization follows a pattern like proj‑env‑resource‑type, embed that into the description: “Create a security group named prod‑web‑sg.” The AI will honor the naming, saving you from a rename later.
And don’t forget dependencies. If the EC2 instance needs to be attached to the security group you just described, mention it: “Launch the Ubuntu instance and attach it to the prod‑web‑sg security group.” That way the generated Terraform will include the proper aws_security_group_rule reference.
Once you have a solid paragraph, it’s time to let the AI work its magic. Paste the description into SwapCode’s free AI Code Generator and watch the transformation happen in seconds.
While the video walks you through the process, keep an eye on the output. Does it match every detail you wrote? If something feels off, tweak your plain‑English prompt and try again. Small changes like adding “private subnet” or specifying “CIDR 10.0.1.0/24” can dramatically improve the result.
Need a little extra help refining your description? Check out Assistaix’s AI assistance platform for tips on crafting clearer prompts and debugging generated code. It’s a handy side‑kick when you hit a snag.
Now that you have a polished description, run it through the generator and you’ll receive a ready‑to‑apply .tf file. Open the file, skim for any hard‑coded values you might want to parametrize, and commit it to your repo. You’ve just turned a coffee‑chat idea into infrastructure as code without writing a single line of HCL yourself.

Finally, document the original plain‑English sentence alongside the generated code in your version‑control comments or a shared wiki. Future teammates will instantly see the “why” behind each resource, making onboarding smoother and reducing the chance of drift between docs and code.
Step 2: Choose a Natural‑Language‑to‑Terraform Conversion Tool
Now that you’ve nailed down a clear, plain‑English spec, the next question is: which AI assistant should actually turn those words into Terraform HCL? The market’s buzzing with options, but you don’t need a heavyweight suite to get solid results.
First, ask yourself what you value most. Do you need a tool that lives inside your CI pipeline, or are you looking for a quick‑draw web UI you can fire up from a coffee break? Do you want something free that you can tinker with, or a paid service that promises enterprise‑grade security?
Three practical categories to consider
Below is a quick cheat‑sheet that breaks the most common choices into bite‑size columns. It’ll help you spot the sweet spot for your workflow without drowning in feature bloat.
| Feature | Tool | Notes |
|---|---|---|
| Free web UI, instant results | SwapCode AI generator (online) | Zero‑setup, supports plain‑English prompts, ideal for ad‑hoc snippets. |
| CLI integration, version‑controlled | Open‑source “terraform‑nlp” plugin | Runs locally, can be added to GitHub Actions, community‑maintained. |
| Enterprise support, policy enforcement | Commercial AI‑code platform (e.g., OpenAI Codex + custom wrapper) | Requires API key, offers audit logs and role‑based access. |
If you’re leaning toward the free, no‑install route, the SwapCode AI generator is a solid first stop. It lets you paste your sentence, hit “Generate,” and instantly receives clean HCL. You can then copy the output into your repo, run terraform fmt, and you’re good to go.
But let’s not stop at the obvious. Real‑world teams often blend tools. Take a mid‑size fintech that needed rapid test‑environment spin‑up for each pull request. They used the free web UI for quick prototyping, then baked the same prompt logic into a custom script that calls the open‑source CLI plugin during CI. The result? Consistent code generation with zero manual copy‑pasting, and the whole process is auditable because the CLI runs inside their pipeline.
Step‑by‑step: Trying the SwapCode web UI
1. Open the How to explain source code in plain english using AI guide to see a live demo of the prompt format.
2. Navigate to the SwapCode generator page, paste your sentence (e.g., “Create a VPC with two public subnets in us‑west‑2, a security group allowing SSH from 203.0.113.0/24, and an Ubuntu 22.04 t3.micro instance”), and click Generate.
3. Review the output: check CIDR blocks, security‑group rules, and instance tags. The AI is good, but you’re still the gatekeeper.
4. Save the HCL to main.tf, run terraform init and terraform validate. Fix any minor mismatches, then commit.
5. (Optional) Add the original sentence as a comment at the top of the file – it becomes living documentation.
Integrating a CLI‑based solution
For teams that already have a CI/CD pipeline, the open‑source plugin can be installed with go get or via a Docker image. Once installed, a simple shell wrapper can feed the same plain‑English string to the plugin and capture the generated HCL.
Example script snippet:
#!/bin/bash
PROMPT="Create a VPC in eu‑central‑1 with CIDR 10.1.0.0/16, two private subnets, and an IAM role for EC2."
terraform-nlp generate "$PROMPT" > generated.tf
terraform fmt generated.tf
Put that script into a GitHub Action step, and every push that updates the spec automatically rewrites the Terraform files. You get repeatable, version‑controlled IaC without ever opening a browser.
What about cost and data privacy?
Free web tools usually run on shared infrastructure, so if you’re handling sensitive VPC layouts or compliance‑bound environments, you may prefer the self‑hosted CLI. It keeps your prompts on‑prem and lets you lock down API keys.
On the pricing side, most free generators have generous limits – enough for daily dev work. Commercial APIs charge per token, but the cost of a few hundred tokens for a single VPC spec is pennies.
So, which path feels right for you? If you’re just starting out, pop open the web UI, generate a couple of modules, and see how it feels. If you’ve already built a CI pipeline, experiment with the CLI plugin and automate the whole flow.
And remember, the tool is only as good as the prompt you give it. Keep your sentences clear, include region, CIDR, and any security nuances – the AI will mirror every detail.
Looking to share the results with a wider audience? A well‑written blog post about your Terraform‑as‑code workflow can boost your personal brand. Platforms like Rebelgrowth help you turn technical write‑ups into SEO‑friendly articles, while Assistaix can automate follow‑up tasks like ticket creation or cost‑report generation after your infrastructure lands.
Step 3: Map English Statements to Terraform Resources
Now that you’ve got a solid English spec and a tool that can spit out HCL, the next hurdle is turning each phrase into the right Terraform resource.
It sounds simple until you realize the AI can sometimes guess the wrong resource type or miss a required argument. That’s why we pause, break the sentence down, and manually map the intent before committing the code.
So, how do you actually do that mapping?
Break the sentence into resource keywords
Start by scanning your plain‑English line for nouns that usually correspond to cloud objects – “VPC”, “subnet”, “security group”, “EC2 instance”, “IAM role”, and so on. Each of those nouns becomes a candidate Terraform resource block.
For example, “Create a VPC in us‑east‑1 with CIDR 10.0.0.0/16, two public subnets, and an SSH‑only security group” yields three keywords: aws_vpc, aws_subnet, and aws_security_group.
Tip: jot these down in a quick checklist so you don’t lose any piece while the AI is generating the file.
Match keywords to Terraform blocks
Next, pull up the provider documentation (or the quick‑reference on the official Terraform style guide) and locate the exact block syntax for each resource.
Write a stub for each one, copying the required arguments first – usually name, region, and any identifiers like cidr_block. Then, fill in the optional arguments that your English sentence mentioned, such as ingress rules for a security group or availability_zone for a subnet.
Here’s a tiny checklist you can paste into your editor:
- Resource type (aws_vpc, aws_subnet, aws_security_group, etc.)
- Required arguments (provider‑specific identifiers)
- Optional arguments extracted from the English spec
- Meta‑arguments (like
countorfor_each) if you need multiple similar resources
Does this feel like a lot of work? Not really – you’re just formalizing what the AI already guessed, and you gain full control over naming, tagging, and ordering.
Fine‑tune with style conventions
Once your blocks are in place, run them through terraform fmt to enforce the formatting rules that keep the code readable: two‑space indents, aligned equals signs, and blank lines between logical groups (Terraform’s style guide calls this “idiomatic” formatting).
After formatting, scan for any duplicated resources or missing dependencies. If two subnets share the same CIDR range, the AI might have copied it verbatim – correct it. If a security group references a CIDR that isn’t defined elsewhere, double‑check the original sentence.
Finally, add a short comment at the top of the file that echoes the original English sentence. That comment becomes living documentation, so anyone reading the HCL instantly sees the business intent behind each block.
One practical trick is to keep a mapping table in your README: column A holds the original English clause, column B shows the corresponding Terraform resource name. When you revisit the code months later, that table instantly reminds you why each block exists.
Now you’ve turned a conversational spec into a clean, maintainable Terraform configuration that follows best‑practice styling. The next step is to validate the file, run terraform plan, and let the AI‑generated code do the heavy lifting while you keep the guardrails tight.
Ready to give it a go? Grab your latest English spec, open your editor, and start mapping – you’ll be surprised how quickly the “manual” step becomes a habit that saves you from hidden bugs later.
Step 4: Validate and Test the Generated Configuration
Alright, you’ve got a fresh main.tf that looks like it came straight from your English spec. The next question is: does it actually work, or is it just pretty on paper? That’s where validation and testing step in – they’re the safety net that catches the little things you might have missed while the AI was busy translating your words.
Run Terraform’s built‑in validators first
Start with the simplest command: terraform validate. It parses the HCL, checks syntax, and makes sure required arguments are present. If you see an error about a missing cidr_block or an undefined variable, jump back to the generated file and fix it. Think of this as the AI’s spell‑check for infrastructure.
Next, run terraform fmt to enforce the community‑standard formatting. A cleanly formatted file isn’t just aesthetic – it reduces diff noise and makes peer reviews smoother. If you’re using a CI pipeline, add these two commands as pre‑flight checks so nobody can merge broken HCL.
Dry‑run with terraform plan
Now comes the real preview. terraform plan shows you the exact actions Terraform will take against your cloud provider. Look for any “replace” actions on resources you didn’t intend to touch; that often hints at a missing depends_on or a mismatched naming convention.
Real‑world example: A fintech team generated a VPC with two subnets, but the plan showed one subnet being destroyed and recreated because the CIDR block overlapped with an existing one in the same account. The fix? Update the English spec to include unique CIDR ranges, then regenerate.
Automated testing with terraform validate in CI
Push the file to a feature branch and let your CI run terraform init, terraform validate, and terraform plan. If any step fails, the pipeline should block the merge. This way you catch errors before they reach production.
Pro tip: add a simple make test target that runs those commands and outputs a short summary. Your teammates can then type make test locally and get instant feedback.
Validate resource‑specific constraints
Some resources have hidden constraints that Terraform’s generic validator won’t catch. For instance, an AWS security group rule can’t reference a CIDR that isn’t a valid IPv4/IPv6 block. To verify, you can use the AWS CLI:
aws ec2 describe-security-groups --group-ids $(terraform output -raw sg_id)If the output shows an invalid rule, go back to the English sentence and clarify the intended source IP.
Another handy check is to run terraform providers schema and compare the generated attributes against the provider documentation. This helps you spot deprecated arguments that the AI might still be using.
Real‑world sanity checks
Imagine you’ve just generated an aws_instance with a custom AMI ID. Before you apply, spin up a temporary EC2 instance manually with the same AMI and run a quick ssh test. If the instance boots but the security group blocks your IP, you now know the generated ingress rule is off.
Or, for a more automated angle, use How to generate dockerfile from project description ai: A step‑by‑step guide as a reference for how AI can embed validation logic into the generated code – the same pattern applies to Terraform: embed local_file resources that output a JSON manifest you can feed to downstream linters.
Iterate, document, repeat
Every time you fix a validation error, add a short comment at the top of the file that mirrors the original English sentence. Over time you’ll build a living “spec‑to‑code” map that makes future reviews a breeze.
And don’t forget to tag a trusted advisor for a quick sanity check. For engineering leaders who want an extra layer of governance, partnering with a strategic consultancy can be a game‑changer. CTO Input specializes in helping mid‑market companies adopt AI‑generated infrastructure safely, ensuring you’ve covered compliance and security checkpoints before you hit “apply”.
Bottom line: validation isn’t a afterthought – it’s the final piece that turns a clever AI‑generated snippet into production‑grade Terraform. Run validate, plan, and your own sanity checks, then commit with confidence.
Step 5: Optimize and Refactor the Terraform Code
You’ve got a working main.tf, but raw HCL can still be a bit of a mess. Think of it like a kitchen after dinner: the food’s ready, but you need to clean up before the next round. That’s where optimization and refactoring step in.
Why refactor at all?
Because a tidy codebase saves you from future headaches. When you or a teammate returns weeks later, clear naming, DRY patterns, and modular blocks let you understand the intent without hunting through comments.
Does it feel like extra work? In the long run it pays off – fewer bugs, smoother CI runs, and you get to brag about “clean Terraform”.
Start with naming conventions
Give every resource a purpose‑driven name instead of generic my_vpc or sg_1. Something like vpc_prod_us_east_1 or sg_ssh_office tells you instantly what the block does.
Tip: mirror the original plain‑English sentence in the resource tags. If your spec said “VPC for production in us‑east‑1”, add a tag Purpose = "prod‑vpc‑us‑east‑1". Tags become a searchable breadcrumb in the AWS console.
Extract repeated logic into modules
Do you see the same aws_security_group pattern across multiple environments? Pull it into a reusable module. Your module should accept variables for CIDR blocks, port numbers, and description strings.
When you call the module, you pass the specific values from the spec. This way, if you ever need to tighten SSH rules, you edit the module once and every environment inherits the change.
Leverage locals for calculated values
Instead of hard‑coding CIDR math or resource IDs, use locals. For example, you can compute subnet CIDRs based on a base network:
locals {
  base_cidr = "10.0.0.0/16"
  subnet_bits = 8
  subnet_1 = cidrsubnet(local.base_cidr, local.subnet_bits, 0)
  subnet_2 = cidrsubnet(local.base_cidr, local.subnet_bits, 1)
}
This keeps the core values in one place and makes future adjustments painless.
Format, lint, and enforce style
Run terraform fmt -recursive to enforce two‑space indentation and blank lines between logical groups. Pair it with terraform validate and a linter like tflint in your CI pipeline.
If you like a visual diff of what changed after refactoring, JSON to YAML Converter – Free Online Tool can help you dump a terraform show -json output and compare it side‑by‑side in a more readable format.
Trim the dead weight
Look for any resources that never get used – orphaned security groups, empty tags, or variables that are declared but never referenced. Remove them. Each stray line is a potential source of drift between your code and the actual cloud state.
And don’t forget to delete commented‑out blocks. It’s tempting to keep them “just in case,” but they clutter the file and can mislead reviewers.
Document the why, not just the what
At the top of each file, add a short comment that restates the plain‑English requirement. Below that, sprinkle inline comments where you made a design decision – “using CIDR /24 to stay within AWS limit of 5 subnets per VPC”. This mirrors the “spec‑to‑code” map we built earlier.
Remember, documentation is a habit, not a one‑off task. Treat it like a commit message for each refactor.
Check the plan again
After you’ve cleaned things up, run terraform plan one more time. The diff should be mostly “no changes” unless you intentionally updated a module or variable. If you see unexpected replacements, double‑check your dependencies – maybe you removed a depends_on that was keeping resources in order.
Does the plan still look good? Then you’re ready to push the changes, tag the PR, and let the team know the code is now “production‑ready and maintainable”.
In short, optimizing and refactoring isn’t just aesthetic; it’s a safety net that catches hidden drift, reduces future toil, and makes the whole AI‑generated workflow feel like a well‑engineered pipeline.
Step 6: Automate the Conversion Workflow with CI/CD
Now that you’ve got a clean Terraform file generated from plain English, the real magic happens when you let your CI/CD system run the whole cycle for you.
Why automate? Because a manual copy‑paste step is the perfect place for a typo or a forgotten variable, and those little slips can cost minutes—or dollars—once they hit production.
Below is a quick, human‑friendly checklist you can drop into any GitHub Actions, GitLab CI, or Azure Pipelines file.
1️⃣ Keep the original plain‑English prompt as a file (e.g., prompt.txt) so the pipeline can feed it to the generator each run. 2️⃣ Run the AI generator in a Docker container or via a CLI wrapper – this guarantees the same version of the model every time. 3️⃣ Pipe the output straight into terraform fmt and terraform validate to catch syntax errors before they ever reach a cloud account. 4️⃣ Execute terraform plan and archive the plan as an artifact; that gives reviewers a read‑only view of what will change. 5️⃣ If the plan looks good, let terraform apply run behind a protected environment variable that only your CI service can read.
Here’s a minimal GitHub Actions workflow that puts those steps together. Save it as `.github/workflows/terraform-ci.yml`.
name: Terraform CI

on:
  push:
    branches: ["main", "dev"]
  pull_request:
    branches: ["*"]

jobs:
  generate-tf:
    runs-on: ubuntu-latest
    container:
      image: swapcode/ai-terraform-generator:latest
    steps:
      - uses: actions/checkout@v3
      - name: Generate Terraform
        run: |
          ai-generator --prompt prompt.txt > generated.tf
      - name: Format & Validate
        run: |
          terraform fmt generated.tf
          terraform validate generated.tf
      - name: Upload artifact
        uses: actions/upload-artifact@v3
        with:
          name: generated-tf
          path: generated.tf

  plan-tf:
    needs: generate-tf
    runs-on: ubuntu-latest
    steps:
      - uses: actions/checkout@v3
      - name: Download generated TF
        uses: actions/download-artifact@v3
        with:
          name: generated-tf
      - name: Terraform Init
        run: terraform init
      - name: Terraform Plan
        run: terraform plan -out=plan.out
      - name: Upload plan
        uses: actions/upload-artifact@v3
        with:
          name: tf-plan
          path: plan.out

  apply-tf:
    if: github.ref == 'refs/heads/main' && github.event_name == 'push'
    needs: plan-tf
    runs-on: ubuntu-latest
    environment: production
    steps:
      - uses: actions/checkout@v3
      - name: Download plan
        uses: actions/download-artifact@v3
        with:
          name: tf-plan
      - name: Apply Terraform (manual approval required)
        run: terraform apply "plan.out"
        env:
          AWS_ACCESS_KEY_ID: ${{ secrets.AWS_ACCESS_KEY_ID }}
          AWS_SECRET_ACCESS_KEY: ${{ secrets.AWS_SECRET_ACCESS_KEY }}
A couple of things to notice: the `generate‑tf` job runs in a container that already has the AI model installed, and the `apply‑tf` job only runs on the `main` branch after a manual approval step. This mirrors the “preview‑first” mindset we built into the earlier steps.
If you’re using GitLab, the same idea translates to a `.gitlab-ci.yml` file: a stage that calls the generator, a stage that validates, and a protected‑environment stage for apply. The syntax differs, but the flow stays identical.
Tip: store the plain‑English prompt in the repository, not just in your mind. When a teammate opens a PR, they can instantly see the business intent, and the CI will regenerate the exact same HCL every time. It also gives you an audit trail – the prompt file plus the generated plan become part of your version history.
Now, let’s talk about secrets. Your cloud provider credentials should never be hard‑coded. In GitHub Actions you can add `AWS_ACCESS_KEY_ID` and `AWS_SECRET_ACCESS_KEY` as `secrets` and reference them in the workflow. The same applies to any API key the AI generator needs. This keeps the pipeline secure and compliant.
Finally, make the CI feedback loop as friendly as possible. Add a comment to the PR that includes a link to the Terraform Cloud run or the plan artifact. Teams love a quick visual that says, “Hey, this change will add two subnets and nothing else.” If you need a visual diff, you can pipe `terraform show -json` through the Best AI Code Tools comparison page to render a readable JSON‑to‑HTML view. It’s not required, but it turns a dry log into something you can actually skim.
A common pitfall is letting the AI generator run on every push, even when the spec hasn’t changed. To avoid unnecessary churn, add a simple check at the start of the job: compare the checksum of prompt.txt against the one stored in the previous build. If they match, skip the generation step and just run terraform fmt and validate on the existing files. This saves minutes on each CI run and keeps your audit logs cleaner.
Conclusion
We’ve walked through turning a casual English sentence into a ready‑to‑apply Terraform module, and by now you probably feel the friction melt away.
If you remember the three pillars – clear intent, a reliable AI generator, and a tight CI validation loop – you have a repeatable recipe that any team can adopt without reinventing the wheel.
The biggest win is the speed gain: what used to take an hour of manual HCL crafting now happens in seconds, letting you focus on architecture decisions rather than syntax quirks.
And because the prompt file lives alongside your code, future reviewers instantly see the business requirement that sparked each resource – a living doc that bridges dev and ops.
A quick sanity check before you merge: run terraform fmt, terraform validate, and a dry‑run plan. If nothing unexpected shows up, you’ve got a production‑ready change that’s auditable and repeatable.
So, what’s the next step? Grab your next infrastructure idea, write it in plain English, feed it to SwapCode’s free AI code generator, and let the pipeline do the heavy lifting.
When you see the plan preview in your PR, you’ll know you’ve built a bridge between intent and infrastructure – and that’s the real power of being able to generate terraform configuration from plain english.
FAQ
How does the AI generator actually turn my plain‑English sentence into Terraform configuration?
Behind the scenes the model parses the natural‑language description, identifies cloud nouns like “VPC”, “subnet”, or “security group”, and maps them to the corresponding AWS provider resources. It then stitches together the required arguments – region, CIDR block, tags – based on the details you supplied. The result is a syntactically correct .tf file that mirrors every clause you wrote, ready for a quick terraform fmt and validate.
Do I need to be an HCL expert before I start using the AI‑powered workflow?
Not at all. The whole point is to let you focus on the business intent, not the syntax. You’ll still want a basic sense of what resources you’re requesting – for example, knowing that an “EC2 instance” lives inside a subnet – but the AI fills in the boilerplate. After the file is generated you run the usual Terraform validators, which give you a safety net and help you learn the missing pieces as you go.
What’s the most reliable way to write my English prompt so the AI gets it right?
Think of the prompt as a recipe: start with the high‑level resource, then add scope, security, and compute details in the same sentence, separated by commas. Include region, CIDR blocks, port numbers, and any tags you care about. For example, “Create a VPC in us‑east‑1 with CIDR 10.0.0.0/16, two public subnets, an SSH‑only security group, and a t3.micro Ubuntu instance tagged ‘web‑server’”. Consistency in phrasing makes the AI’s job easier and reduces surprises.
Can I plug the free AI code generator into my CI/CD pipeline?
Absolutely. The generator can run inside a Docker container or as a CLI wrapper, so you can add a step that reads prompt.txt, calls the AI, and writes the output to generated.tf. Follow that with terraform fmt, terraform validate, and a terraform plan artifact. Because the prompt lives in version control, every build reproduces the exact same HCL, giving you a repeatable, auditable workflow.
How do I keep the generated Terraform code secure and compliant?
Treat the AI output like any other code contribution: run static analysis tools such as tflint, enforce naming and tagging conventions, and scan for open ports or overly permissive CIDR ranges. Store cloud credentials only as encrypted CI secrets, never in the prompt file. If you work with regulated data, run a policy‑as‑code check (for example, Open Policy Agent) before any apply step to ensure the resources meet your compliance rules.
What should I do if the AI produces invalid or incomplete resources?
First, run terraform validate – it will point out missing arguments or syntax errors. Then compare the generated block to the official provider docs and add the missing fields manually. If a whole resource is missing, revisit your prompt and make the noun explicit (“add an IAM role for the EC2 instance”). Over time you’ll build a prompt style that consistently yields complete, production‑ready code.